Solving the Powder Room Hand Towel Dilemma: A Simple and Beautiful Solution

powder room towel

It's the little things that often cause the most frustration, isn't it?  One of my pet peeves has always been the hand towel in my powder room never staying on the hook.  It is one of the most used rooms in our house. No matter how carefully I hung it, it would always slide off and end up crumpled on the floor or look a mess.  Not exactly the look I was going for.

I finally came up with a method that not only works but also adds a touch of charm to the room.

Here's how I solved the hand towel dilemma once and for all:

The Problem

Hand towels are essential in any powder room, providing guests with a convenient way to dry their hands. However, the problem I encountered was that the towel would rarely stay in place or it always looked messy. I wanted a solution that matched my decor style and wouldn’t look disheveled after use.

bath towel

The Discovery

I had this idea. What if I could find a way to secure the towel more firmly? My design style loves detail. In my mind's eye, I saw an antique chain draped over the towel somehow securing it to the hook but I wasn’t sure how to do it.  One day I saw a chain at the craft store that had the antique look I wanted so I just brought it home to see what I could come up with. I could use the chain not just as a functional solution but also as a decorative element that enhances the room's aesthetic.

The Solution

Here’s the step-by-step process of what I did:

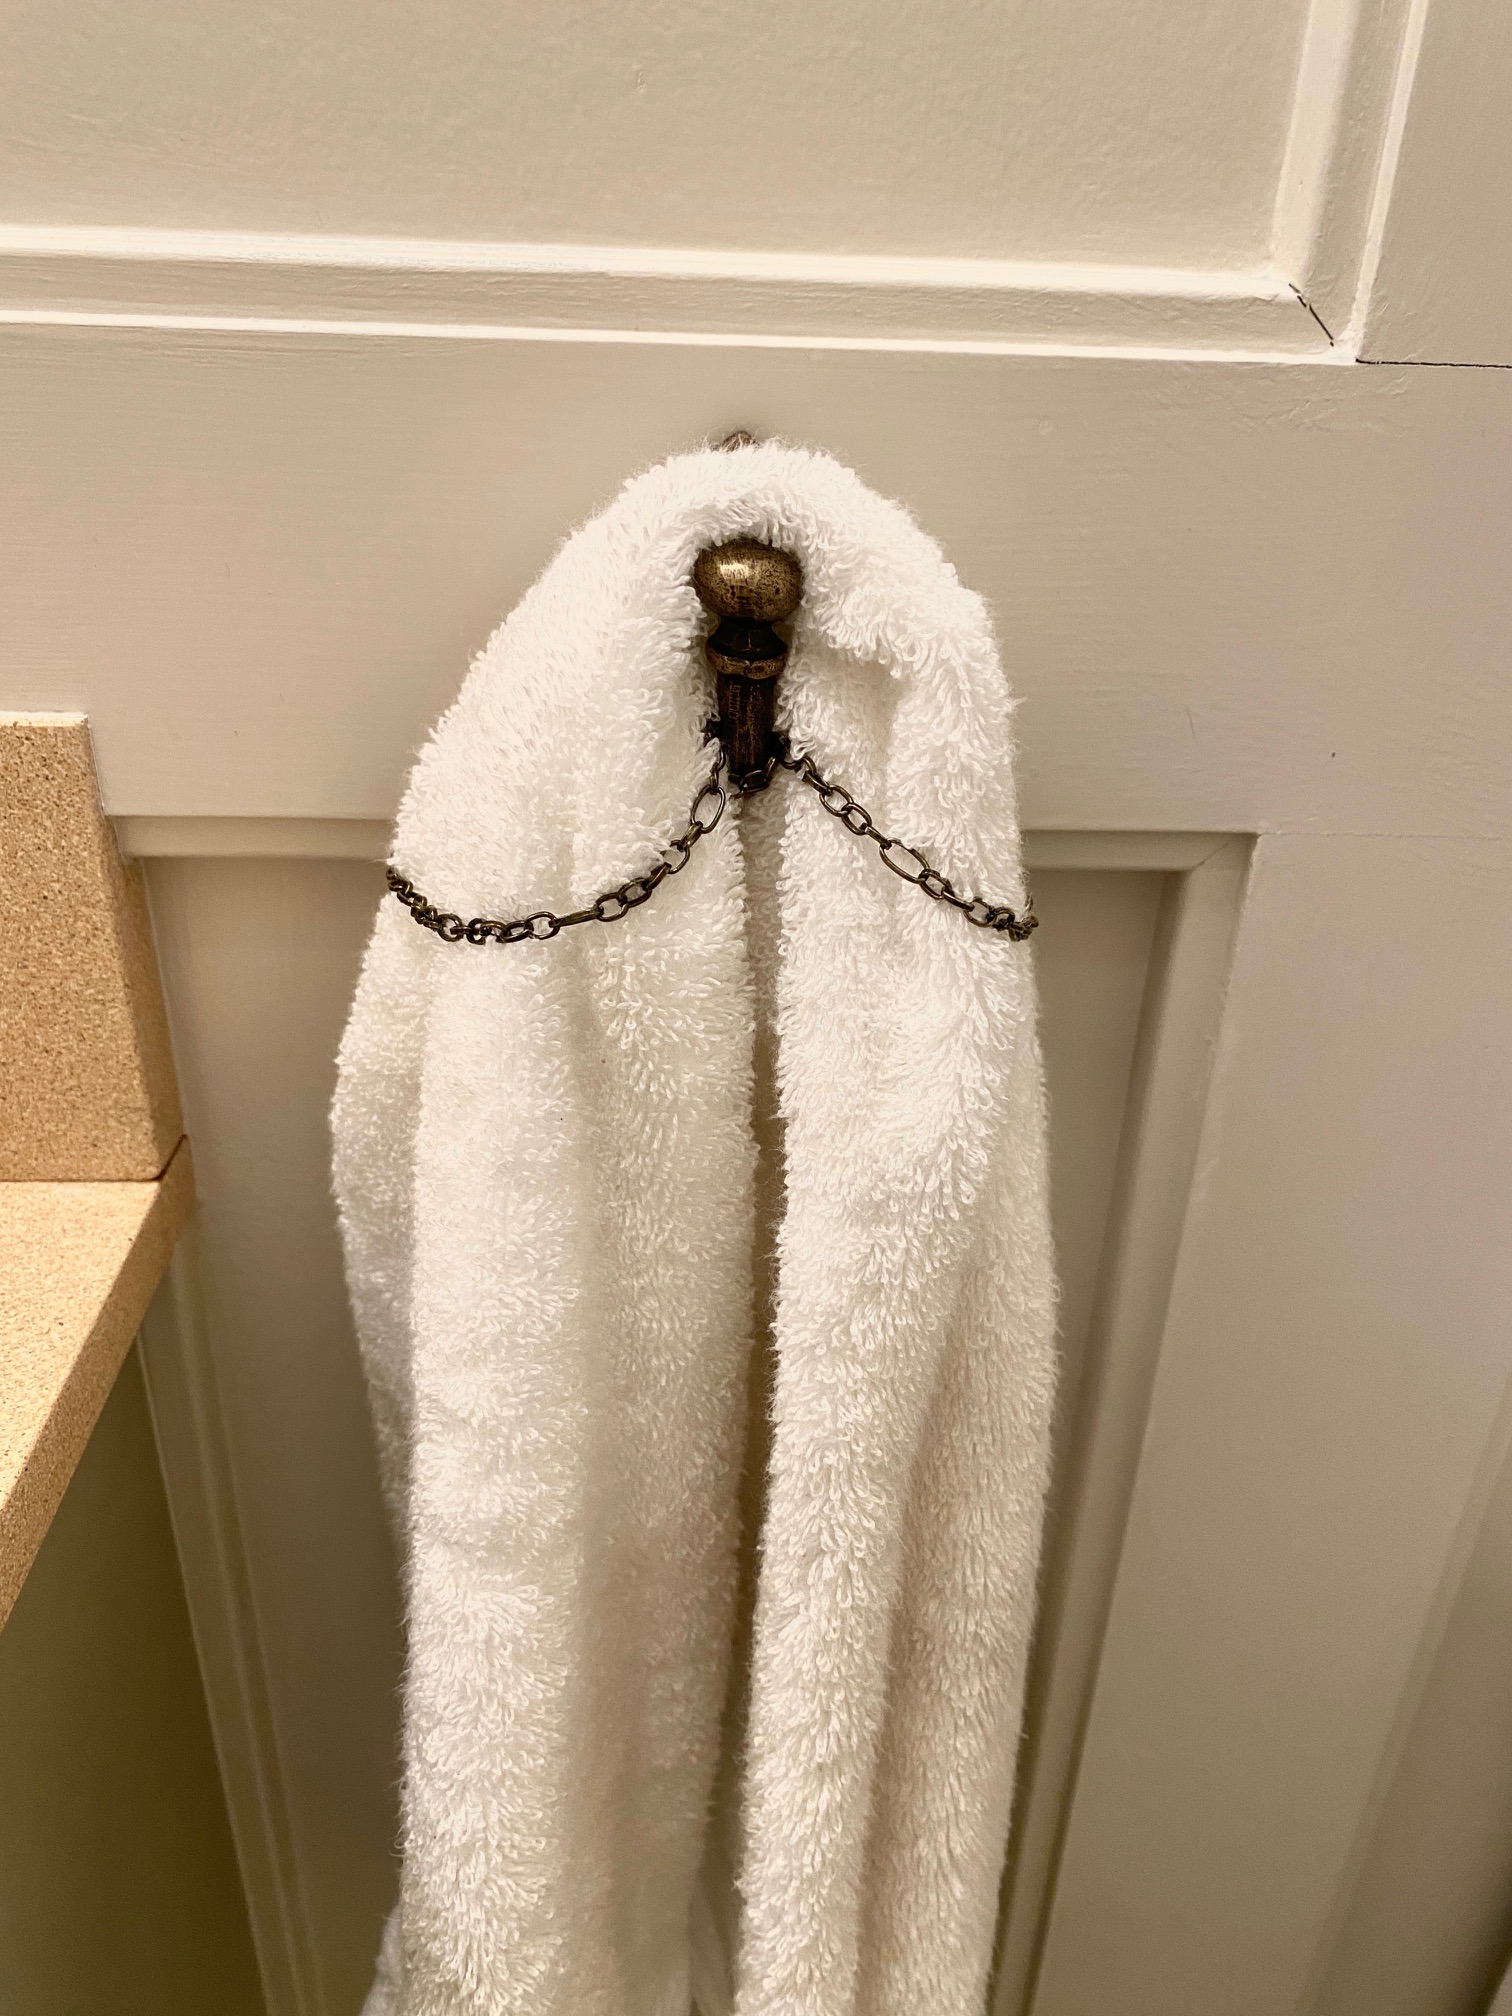
Find the Right Chain: I chose a chain that was both sturdy and decorative. Itneeded to be strong enough to hold the towel securely but also match the decor of the powder room. I chose a chain with an antique finish.

Twist the Chain on the Hook: I twisted the chain once around the hook pulling the loop upward.


Drape the Towel: Next, drape the towel over the hook with the towel hanging evenly on each side.

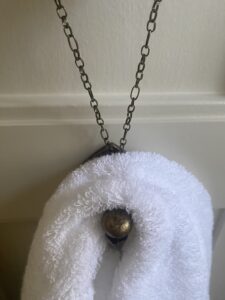
Twist the Chain Again to Secure: Then, I let each side of the loop drape over each sideand twisted the end of the loop over the end of the hook as pictured. The result was a chain that hung on the hook with a droop on each side through which the towel could be fed.
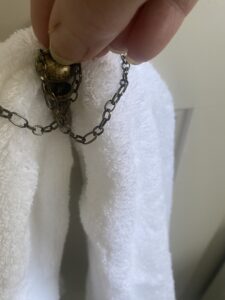
I could easily dry my hands on the towel and it stayed in place perfectly. The chain held the towel securely, preventing it from sliding off.


The Result

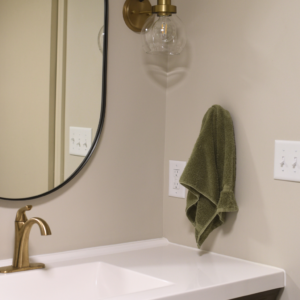
Not only does this method keep the towel firmly in place, but it also adds a unique and stylish touch to the powder room. The decorative chain acts as an elegant accessory, complementing the rest of the decor. It’s a simple, practical, and beautiful solution to a problem that had been a constant annoyance.

Conclusion

Sometimes, a creative solution is necessary to solve a practical issue for a design to be effective and functional.  The best solutions are the ones that combine functionality with your aesthetic. By thinking outside the box and using a decorative chain, I was able to solve the hand towel dilemma in a way that’s both effective and looks beautiful too. 

I encourage you to try this method if you’re dealing with the same issue. Choose a chain or even a ribbon that matches your style!  It’s these small changes that makes a big difference.


Easy Spring Flower Arrangement

forsythia in a vase
Easy DIY flower arrangement

Gathering materials for your spring floral arrangement

This easy spring floral arrangement of artifical forsythia blooms is a delightful addition to a coffee table.

Forsythia was abundant on the east coast in Virginia and I absolutely loved seeing it burst forth every spring.  It was one of the first signs of spring along with the crocus and dogwoods. If you aren’t familiar with this spectacular bush here is a link to a collection of google search images. I wanted to capture that feeling in that moment of Springtime by putting some forsythia in my family room. Today, I am going to show you how you can too.

I got these artifical stems at Jo-Ann fabrics for about $2 a piece on sale.  Two branches came on one stem so I cut many of them apart.  It’s always nice to use at least two different size blooms to create interest and texture, especially if you’re making a flower arrangement with only one color like this one.  I thought these would be a nice combination.


2 kinds of yellow artificial flowers for this easy DIY flower arrangement

I also grabbed some Birch branches from my backyard. Your yard can be a wealth of possible material for a DIY flower arrangement.  I’m going to use some of that for that natural look.  If you don’t want it look all twiggy it’s nice to have a little bit of greenery at the base to hide some of those gaps between the stems. 

Birch tree branches for this easy DIY flower arrangement

You will also need Spanish moss.  The Spanish moss is for the base to cover the foam.

Spanish moss for easy DIY flower arrangement

This is artificial foam.  There is a darker green foam that you can use for fresh flowers.  Since I am using artificial flowers and an open-topped vase, I’m using this foam. The vase came from my inventory of decor items I bought for decorating a hair salon each Christmas.  So I thought I would use this for my base for my flowers.

To begin, take some artificial foam and cut it with a bread knife or a serrated edge knife to fit into my vase.  It’s easy.  

foam for artificial flowers in this easy DIY flower arrangement

The Vase for your Arrangement

You can use almost anything for a vase of a flower arrangement.  Today I’m making a large and easy DIY flower arrangement.   

Glass Vase for easy DIY flower arrangement

If you have a narrow topped vase…. My son made this. You don’t need anything but a couple stems.  It’s a sweet little thing that we put by our sink.

So If you have a vase with a narrow neck you can just put a couple stems in it. But if you have something like the glass vase I am using which is larger, you are going to need some kind of a foam to hold the stems. Otherwise the stems would to just flop over

Sandra Forbes holding bud vase

Because it’s a glass vase I don’t want the foam to be seen and have it touching the vase. I am going to put Spanish moss between the foam and the glass.  Cut off the corners so it is not touching the vase. Then put some spanish moss at the bottom of the vase because  there’s going to be a gap between the foam and the bottom of the curved vase.   Fill in around the foam with the moss.  Simple as that.  Making sure that, as you go, that you’re pushing the moss down to cover the foam so you don’t see the foam.  I use a long knife to get down to the bottom because my fingers aren’t long enough.  It doesn’t look very natural when you see the foam.  Right?   Making sure that you can’t see the foam and there’s no gaps.  

Placing moss around foam

Preparing the Spring Flower Arrangement Base

Before I can put the stems in, I want to put some greenery in the base here.  Grab your wire cutters.  You’re tempted to just cut at the bottom where the side stems meet the main stem but that’s a little bit too long for what I’m intending. It’s okay to go ahead and cut it even shorter than that if that’s what you need. The key to flower arranging is balance. So if I’m going to put a little bit on one side, I am going to put one on the other side so there is a balance and a symmetry to your floral arrangement. And put those on the other two sides so that there’s four or more coming from center.  Those are going to be the base. 

Preparingn the base for the DIY flower arrangement

Arranging the Stems of a Easy Spring Flower Arrangement

So we have laid in the foundation greenery to create the base.  The next part is to create the height.  The height of the flowers should be about one and a half times the height of your of the vase. My vase is seven and a half inches so we want to shoot for around 10 to 12 inches more for the flowers. I created height with those branches and a piece of  the same greenery that I used for the base placed in the center.  I want to bring the greenery from the base up into the inside of the floral arrangement to create cohesivity. You don’t want all the green on the bottom and the yellow on top.  You want the green to be mixed up so I’m going to put that piece of greenery in the center. 

Sandra working on floral arrangement

Take the yellow… your main pieces and start working from the outside of the circle in rotating as you go.  We are going to go around the outside first.  Always fluff up your pieces as well  so you don’t just keep them all together. What’s nice about artificial flowers is that they can be fluffed up a little bit. 

Use rotational symmetry

Insert one stem on the right side and I turn it around and put another stem on the opposite side working and rotating as you go. As I put a piece on one side, I turn it around and put another piece equal on the other side.  So now it’s all balanced and even.  You don’t want to have more flowers on one side than the opposite side. There will be empty spaces in between and that is ok for now. I’m going to go ahead and fill in some of those spaces.  One on this side and another on the opposite side, sticking each into that foam.  Now, I am going to grab my smaller flowers. I place one in between the two and flip it and go to the other side.   Continuing to do that all the way around, filling in the spaces.  Looking at where there are holes.  Just making sure that you’re symmetrical as you go along.  Put one on this side and I want to put one on the opposite side. Keep working until you feel like it’s the full enough that you’re happy with it.

Work from the outside toward the middle

Work around and toward the inside increasing the height of the pieces as you get closer to the center. Here is a link to a video explanation if this helps to see the process visually.

Stand back and look at your arrangement and see what you think. Look at it and see if you’re happy with the way it has turned out.  If there are any holes and if you need to add more  You can always edit and take out.  If you aren’t happy with it, you can always take things out.  It is very forgiving to do floral arrangements.  It is very subjective.  Don’t be scared of them.  It’s basically all about balance.  Put one on one side, the other on the other and just keep rotating.  If you only have 3 of something, make them equal distance apart instead of four. You don’t have to have to be equal in number but they do need to be balanced.

Sandra working on adding flowers

And there you have it.  An easy spring flower arrangement. It is as easy as that.  That’s going to be sitting on my coffee table for the rest of the summer and it will be reminding me of the forsythia of Virginia.

Sandra and finished flower arrangement

How to Make Small Christmas Tree Decorations

Easy and Inexpensive

Here is a quick tutorial on how I made these Christmas Trees. I needed 50! It wasn’t in the budget to buy 50 bristle brush trees. Even at $5 each, I would have had to spend $250! Here is how I made 50 trees for ZERO DOLLARS.

I had this 3 foot piece of artificial garland left over from last year. Why not take it apart and make trees out of each branch? That’s what I did. You can do it too.

My garland had 3 wires. 2 made up the base wire and then the third wire wound about the base of each branch tying them all together. I simply unwound the third wire to separate the branches. Then all there was left to do was to cut the small bristles in the shape of a tree. I have to say that they aren’t that beautiful by themselves but they make a nice statement when put together in a grouping.

My wonderful husband braved the cold and cut some 1 by 2 boards into 10-11 inch pieces. I needed 10 because my client was a Hair Salon and they had 10 stations that needed a decoration.

Each board was then stained a nice walnut finish and 5 holes drilled. The holes were drilled unevenly on purpose. I didn’t want the trees to be in a row. I wanted them overlapping a bit to help the look be more natural. Then each tree base was dipped in glue and one was put in each hole. All that was needed was a simple spray of snow. Voila! The only thing left was to print out a beautiful Christmas message to put under each piece.

Merry Christmas Salon Oriana!

Salon Oriana Christmas Tree
Verified by ExactMetrics